Search

Thursday, 22 December 2016

Foam bird skull poof poof poof

It's been awhile! Well, it's always like this, me coming here and trying to be active and then get distracted and ended up not updating for a long time. Rinse and repeat. XD Well, I'm back now, so. I'm gonna share a tutorial on how to make bird skull (?) !!! But before that, let me talk a little about my Comic Fiesta 2016. Very briefly, I promise.

I'm feeling rather high and cheerful recently, maybe because I've had an awesome CF to end the year with! The day before CF, I did a group pool party photoshoot with my D2MC family. I LOVE THEM TO BITS! I will update on this later on when I have more photos from the photographers..so stay tuned to my Faccebook page: Catnipx 喵喵草 for the photos!

Then on the first day of CF, I cosplayed as Meepo! Along with Sharon, Hui Min, Desi and Grace, we were the first ever Meepo girls group in Malaysia~ I don't wanna brag but I think we were super cute together lololol~ (Once again, photos will be posted to my Facebook page so please like and follow me there!) We did the Bone Ruins set. This set features a bird skull strapped onto the right shoulder of Meepo, like this:


And this post will be a tutorial on the various techniques involved to make this bird skull. I'll be sharing techniques which is applicable for different projects, not just making a bird skull, so you can also use parts of this guide as a reference for other props where applicable.

I'm a Meepo girl owo


Step 1: Materials
Ideally, you would need a foam ball of the right size - I used an 8cm diameter styrofoam ball. For the beaks, cut out EVA foam pieces as seen in the picture. The length I went with was 12cm (on the slightly longer side), where the width of each piece (at the widest point) is 5cm.


 *You can see pieces of tape over the middle of the styrofoam ball in my picture because I'm recycling 2 pieces of old foam domes. This is another option that you can go with if you can't find a full sphere. For Malaysians, you can find styrofoam balls and domes at Art Friend in MidValley.

Step 2: Assembly
I wish I took more pictures in between, argh! Anyway...
Mark your foam ball in the center, draw a line across. Think of where you want to position your eyes, mark them on the ball. Mark a line for where the beak should sit.
Glue the 2 pieces of EVA foam together at the longer side, forming a V shape. Glue the non-pointy part to the styrofoam ball, according to where you initially intended the beak to sit.

pinoy lighter putang ina mo bobo? :3

Step 3: Hollowing out the eyes, skull contouring (wut?)
As seen in the picture above, the eye sockets are hollowed out. To do this, simply burn the styrofoam with a lighter where the eye sockets are supposed to be. *You may want to be careful and not breath in the fumes because its hazardous! Be careful as it should burn pretty quickly. Try to minimize mistakes as more mistakes will lead to you having to do more work patching up later.
Since skulls are not supposed to be round and full, you would need to reduce the roundness at the bottom too. Below each eye/under each side of the beak, use the lighter to lightly reduce the roundness (BURN AWAY THOSE FATS LOL). Try to make it even for both sides.

Step 4: Patching up
This step is especially important if you used 2 domes instead of a complete sphere like me. There are bound to be gaps in between the 2 domes, patch them up with putty.
tub of putty


Fill the gaps and holes in between the parts, then smoothen it out. Personal advice: use your fingers instead of the spread thingy for tricky parts! This is also the time to patch up those extra holes that you have accidentally burnt (if you did).

Step 5: Adding more details
Lightly sketch where the nostrils should be. Cut a super thin strip of EVA foam, stick it securely around where the nostrils are supposed to be. Do the same for the eye sockets.


Add more putty if you wish, where you deem appropriate.

Step 6: Drying it out
Let the putty on your bird skull dry and harden completely under the sun.
Once it's dried, you would need to coat the whole thing with layers of diluted PVA glue/wood glue. Different concentration of glue can be used but I typically go with 1:1.5; wood glue:water. If it's more diluted, coat more layers. *Wait for each layer to dry before coating the next!

Sunbathing birb

Step 7: Spray painting, shading/weathering
Once your entire bird skull is covered properly with layers of glue and dried, spray the whole skull white. *Make sure it's properly covered with glue! Otherwise the acrylic spray paint will very likely burn into your styrofoam!


Paint the eye sockets and nostrils black. Shade/weather the sides with grey or very diluted black paint. Try to make it look as natural and convincing as possible (don't be too neat!)

And done~ Hope the guide for detailed and clear enough! Feel free to leave a comment or PM me on my Facebook page if you are unclear about anything.


Sunday, 2 October 2016

Overwatch dolls~

I don't play Overwatch, actually. Sure wish I do, though. But I suffer from motion sickness and I just thought spending 60USD that I do not have for something that I might not be able to enjoy long at all might not exactly be worthwhile. Still. I really like the character designs and the game seems fun! Maybe I'll try it soon with someone else's account huehue.

Anyway, a friend commissioned me to make these~

D.Va and Ana

Tbh, I am rather proud of these girls! I really like how cute D.Va turned out to be. I hope I did her in-game look justice! I'm happy with the details I manage to include for Ana too! It sure wasn't an easy feat to recreate Ana as an amigurumi doll since her in-game clothes are so complicated with so many details! But it was really fun and challenging to make them anyway~

One of the most special thing about this commission was that, I made their mini weapons~ It took quite some time considering how small it is. It was really hard to handle as well because of its size! I had paint and glue all over my hand when making these LOL.

Materials used for mini weapons: EVA foam of various thickness (2mm, 5mm, 10mm), metal wire, toothpick °°, hot glue, acrylic paint, and clear lacquer spray. 

Sorry there isn't a complete tutorial or visual guide for this.. I made them free hand and just cut as I went along. 

D.Va's gun. I forgot to take a picture of Ana's biotic rifle..

Please note that these mini weapons are not included when you purchase D.Va or Ana doll from me~ BUT. BUT. If you absolutely, desperately need it, you can still commission me to make it separately as a prop for the dolls you purchased from me! Downside is, I will charge separately, accordingly.. (personally wouldn't recommend it lel) Please understand that it is really too much work and so meticulous my eyes were literally like *_*


If you're interested to commission me for amigurumi dolls of your favourite characters, please PM The Craftsroom. Thank you~


Thursday, 22 September 2016

Ray-kyaa-za


Recorded a video of the kawaii Rayquaza I made.. This VivaVideo app is pretty cool :3

*I take commissions for amigurumi! Ships (almost) worldwide ;)
Please visit The Craftsroom on Facebook and PM me your inquiries.

Tuesday, 30 August 2016

Booth C20 @ Animangaki 2016


I had a booth at Animangaki!!!

I'm still too worn out over the weekend to say much. So I guess all I'm gonna say is:

"Thanks for visiting us and please shop with us again!" :)

Thursday, 25 August 2016

Bat for Harley Quinn Cosplay


I had fun turning an ordinary baseball bat into Harley Quinn's bat, as seen in the Suicide Squad movie! I'll just go through the process quickly, and hopefully the picture serves well as a visual guide. It's a super simple prop to make IMO and you'll definitely enjoy it. I almost imagined myself as Harley scribbling my thoughts on my bat LOL.

I started with cleaning the bat to make sure there are not stains left from the stickers I peeled off (lol) of it, and removed the original bandage on the handle. Then I googled for reference images - find as many as you can showing the bat from various angles! 

I did a free-hand sketch of the 'GOOD NIGHT' letters and used it as a template for my bat. Not really sure where I kept that piece of scrap paper but if I find it and also find the time to make a digital copy of it, I'll share it here for free~ Then again, if you wanna be neat, you can choose to type out the words using a computer, have a printed out and just cut out the letters, leaving the center where you can use as a template to colour in on your bat.

Colour it in with red marker! Woohoo! Then outline it with black marker after.

Cursive wordings on the bat...
To be honest, I don't think there is any clear image/movie stills that shows what is really written on the bat that Margot Robbie holds. Most sources seem to point to the lyrics of 'I started a joke' by The Bee Gees, so I went with that. It's very suitable too! 

I wrote the lyrics of the song in cursive letters using a pencil on the bat, then went over it with black marker, and going over some of the words in red marker.

The other empty spaces of the bat, you can choose to fill it with suit symbols and Harley's quotes. For symbols, I see most sources have '◆' on them, arranged in fours. As for the quotes, you can use her quotes from either the movie or even better - the comic series!

The band at the bottom, before the handle...
Sketch the outline with a pencil first. I did it free-hand so there isn't any template that I can share. Start with the top and bottom lines so that you can gauge how wide you want the band to be. Then split the circumference into 4 parts and sketch the outline for the diamond shapes in each part. You can also just draw multiple jointed 'X' till you get 4 diamond shapes evenly distributed around the band. Then, draw a smaller diamond shape inside each big diamond.

I coloured the small diamonds with blue marker, left the space between the small and big diamond empty, and coloured the rest of the band with red marker. Finally, I used a black marker to outline the top and bottoms lines.

Cut out a long strip of white fabric and wrap it around the handle area of the bat! You can use brown/black acrylic paint to 'dirty' the fabric a little, to make it seem worn.

UPDATE**

A photo from Animangaki 2016 where I wore my Harley Quinn cosplay.

The bat looks pretty good, eh? :D
Photo by Skywing Photography


Friday, 17 June 2016

Attempt at needle felting!


I've been seeing lots of crafters making cute little animals and what not by needle felting. They all look incredibly cute and irresistable and so I decided to pick it up and try to learn it myself too!


Conveniently, Daiso sells woolen felt! A packet with 3-4 colours (approx. 20g) would cost you RM5.30. There are various themes and each packet shows a picture of what you could possibly make from the colours available in that particular packet. Of course, the downside is that you can't actually choose the very specific colours you want (eg. you can't just buy 1 shade of red, you'd have to buy the pink and maroon as well).

There are actually many types of wool for needle felting. I'm not quite sure about this myself as I am also very new to this. But I've read that roving wool is the easiest and nicest to work with. To be very honest I am not sure if the type that Daiso sells is roving wool or not. Haha!

For my first attempt, I have decided to make Totoro. No specific reason.. maybe because my boyfriend likes Totoro and one of the many important roles as my boyfriend is, to be the reciever of many gifts (which are bad or failed attempts of a certain handicraft I am doing) from me. So I figured, if it turns out well, good! If it doesn't, well, I tried. At least it's still Totoro, sort of.

Here goes:

prepare the materials!

 Attempt 1:
damn you tiny Totoro that doesn't really look like Totoro

Oh I discovered something that I'd like to share, in case anyone else is like me (who doesn't read any instruction and guides before trying anything new): you'll need to take like 2 or 3 times more of the wool  (when it's rolled up) than the intended size of your end product. Else you'll end up with something much smaller than you intended and it will be more difficult to work with the smaller it is.

So yea, thought my first Totoro was too small and looks fugly. So I grabbed more wool and tried again. This time much bigger and I used safety eyes instead of just black wool for the eyes. Added details and a piece of leaf on the head too~


Kinda cute owo

It's not the best yet but I'm pretty happy with my first attempt. Need to learn how to not poke my own finger as well as produce a neater,smoother finishing.

GONNA BUY MORE MATERIALS AND PRACTICE SO I CAN MAKE MORE SHIT.


Tuesday, 14 June 2016

The Manila Majors 2016

Hello! I am back in Malaysia~

Arrived on Monday night and went straight to cc for a match of Dota 2 lol. And I have just finished unpacking most of the things this afternoon. Now, story time!

We arrived in Manila, Philippines on 10th of June, a Friday. Dec Dec, Sarah, Jam, Jeremy and Mimi came and picked us up from the airport. I think I can say the same for the whole group that we were ecstatic to be in Manila and to finally meet the D2PC members!

Arrived!

Our first Philippines experience was traffic congestion. The entire road was jammed up. Apparently it is always like that, every hour, every day. Except maybe Sundays and midnight. There were a lot of jeepneys on the road! It was rather refreshing to see because we don't have that in Malaysia. We then headed straight for lunch at Phillipines' famous Jolibee! (We actually saw lots of Jolibees on the way to the mall.) The Chickenjoy was super duper delicious! Partly maybe because we were really hungry so at that moment I honestly felt like that was one of the best fried chicken I've ever tasted in my life.

Oh, Dec dec looks like Jolibee!

Dec, Jolibee.

Mini ice creams! 35peso/palette

We then went to the secret shop to see if we could get ourselves Legendary and Rare boxes. But unfortunately, they ran out. But it was still alright because we met some pretty damn awesome cosplayers from all over the world! They were all so close to perfection I honestly don't know which is the best. But I'm super impressed with the Clockwerk cosplay.

Look at thatttt

If I had to pick the best, I would've picked him. His armor and props move and it was timed with Clockwerk's quote and everything. Saw the entire cosplay up close and the details and craftmanship was superb.

short footage. couldn't get the recording of his quotes clearly. :(


A few other notable ones are the Tinker (who took first place), Doom, Undying, Pudge, Timbersaw, etc. Well to be honest, all of them were incredible.


But seriously, all of the cosplays made me speechless. For a moment back there I felt like, damn, I am trash compared to these. I seriously need to improve myself and up my game. Then again it would be a million years before I get to this level (x'D) but well, no giving up!

Invoker!!

One of my personal favourite was the Invoker though, cause, well, he's Invoker. :D Talked to him and apparently he came all the way from China, alone, to take part in the contest. Helped him with his wig and mask during the preselection. Thomas went and became his translator cause he couldn't speak English and the judges couldn't speak Mandarin.

Hi I am a fly
Dec's Tinker helmet hue

I slept all the way in Dec's car to our dinner place. Experienced some Philippines food and damn it was awesome. Sisig is love. <3

Fried chicken intestines. Sisig at the back.


Went back to Dec's house to rest after that. Met and played with fluffy Itchi~ He's super duper cute!! Missing his sad, innocent, y u no luv me face already.

On Saturday, we went to Manila Majors~ We decided to push our full costume cosplays to Sunday so that we could do it together with Dec Dec. So we swapped our originally Sunday's mafia plan to Saturday.
*oppai*


When we got there, the first place we went was the secret shop. Because the day before, they told us that they might restock on the Rare boxes.


But we still didn't manage to get any. I ended up buying 2 common boxes - 1 for me, 1 for my brother.


Common box's loot isn't very exciting.. there's a pair of socks, Manila Major tag, iPhone 6 cover (which is kinda sad for anyone who doesn't use iPhone 6, eg. me), and Dota 2 mousepad. Oh well, at least there's a collectible pin inside!

I got Tusk! Though I was sort of hoping for Lina.

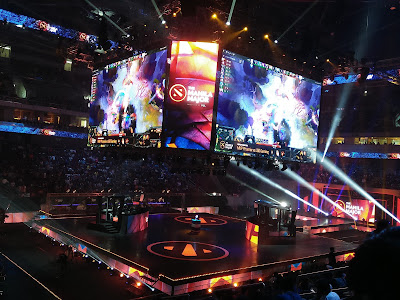
The stage in Mall of Asia Arena was incredible!!

So beautiful <3

The entire set up was so breathtaking!! Watching a live match like that, I had nerdgasm.


a short vid of the arena when we entered


Just gonna put this photo here cause I like the way I smile here. 
I look genuinely happy and excited XD

After the matches, we went outside to take some photos. Surprisingly, many people came and took photos with us!

Photo from Micho's page

Half way through, Na`Vi had their photo session nearby but it was too crowded for us to go in. Me and Hui Min were wondering if Dendi would remember us as we were in the same hero's cosplay when we took selfies with him backstage during Major All Stars. And we didn't find out. :(

Changed out of our formal attire and went for D2PC's First Blood dinner with everyone! I must say it is one of the best dinner I've ever had, with friends from 5 different countries gathered in a room, eating and singing karaoke, joking and laughing together. It's honestly really heartwarming. <3 I miss everyone already!

a sohai singing hahaha

Had Max Fried Chicken for brunch on Sunday. It was yummy! Somehow, Philippines' fried chicken all taste really, really good. We went to The Manila Majors in our full costumes on Sunday.


CM begging for gold

Took lots of photos and met more new friends! To be honest I was slightly panicking when we weren't done with photo taking but the match between OG and Liquid was already going on. It's a good thing that finals are Bo5 lol.


Manage to rush back and watch the final match. It was pretty intense as the crowd was screaming and cheering at almost everything, myself included! That moment when GG was called, damn. I can't even begin to describe the adrenaline rush and that overwhelming urge that brought my close to tears lol. FUCKING GGWP <3

Rewind a little: We actually made a bet the night before to root for OG or Liquid, and me, Micho and Nobu was rooting for OG while Thomas, Hui Min and Dec were for Liquid. We agreed that whoever lost the bet would gift a rare set to each of the winners. And yay~ free rares!!

I would've wanted Fnatic to win, well cause Mushi and Malaysia. But, I'm still happy that OG won. Miracle- and Cr1T- were incredible!!

That night when we got back to Dec's house, Dec and Jam bought us balut to try.
An intro video:


Then, a video of me eating balut lol.


It tastes really good tbh. The taste is like normal boiled egg but slightly saltier, and the texture was like smooth and extra creamy egg yolk. TOTALLY RECOMMENDED. I would've eaten so many of them if I had the chance. Hahaha!!

We got Dec to sleep with us in the same room that night. So we had 6 person squeezed in 1 room lol. Micho managed to record the snoring from all the guys hahaha, it was quite funny. XD

The next morning we went and got lots of snacks and canned sisig to be brought back to Malaysia. Saw this bread at the mart.


We ate buffet lunch at the Vikings with Dec, Fran and our new Aussie friends before flying back home.

A gift I prepared but didn't have the chance to give.


Some sohai photos (which are a must for every trip with friends) to end the post (actually there are more but I'm just gonna put these 2 here):


*some photos on this blog post are not taken by me. stole them from everyone hue hue hue thanks and pls forgive me bye

Monday, 23 May 2016

Penang Anime Matsuri 2016

Instead of leaving on Friday like normal people, me and my boyfriend decided to leave on Saturday morning, because we forgot that Saturday was a public holiday and there's no need to go to work LOL.

Stopped to have lunch and take stupid photos, cause that's what sohai couples do~ :D

face mash
such ugly

Nice photo of me by him (somehow he takes really nice photos of me owo)

 And yes, I wore a Rilakkuma dress thingy on PAM day 1. Had an amigurumi doll made after this look with me too.


But when we reached, it was pretty late so well, nothing much was accomplished that day.

... hence...

ON TO DAY 2!

I debuted my Assistant Mayor Bellwether cosplay, with Mayor Lionheart and Officer Judy Hopps!


Leodore Lionheart, Dawn Bellwether, Judy Hopps
because out-of-character-groufies is a must!

Macam yes photo of our backs taken by Micho

Found Desy as Lina and Miya as TA!

Hi Mr.Deadpool in glasses

Ok ok, I'll take one with you too!

Best friends (before she found out about my evil plan :v)


Thank you Micho for letting us stay at her place for the trip 

Okay that's all. I've got nothing much to say, partly because I am lazy.

Gonna have a proper photoshoot for Zootopia soon. Looking forward to good picturesss